A tooltip is typically used to provide additional information about an element when the user hovers their mouse pointer over it.
Basic Tooltip

<div class="tooltip">Hover over me
  <span class="tooltip-text">Tooltip message</span>
</div>
<style>
/* Container for the tooltip */
  .tooltip {
    position: relative;
    display: inline-block;
    cursor: pointer;
  }
/* Tooltip text */
  .tooltip .tooltip-text {
    visibility: hidden;
    width: 120px;
    background-color: #555;
    color: #fff;
    text-align: center;
    padding: 5px;
    border-radius: 5px;
/* Positioning */
    position: absolute;
    z-index: 1;
    bottom: 125%; /* Adjusts tooltip position */
    left: 50%;
    margin-left: -60px;
/* Fade-in effect */
    opacity: 0;
    transition: opacity 0.3s;
}
/* Show the tooltip text on hover */
  .tooltip:hover .tooltip-text {
    visibility: visible;
    opacity: 1;
}
/* Arrow for the tooltip */
  .tooltip .tooltip-text::after {
    content: "";
    position: absolute;
    top: 100%; /* Bottom of the tooltip */
    left: 50%;
    margin-left: -5px;
    border-width: 5px;
    border-style: solid;
    border-color: #555 transparent transparent transparent;
}
</style>
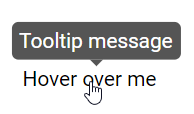
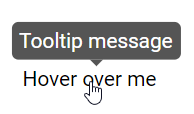
The above example creates a tooltip that appears when the user hovers over the text "Hover over me." The tooltip has a smooth fade-in effect and an arrow pointing to the hovered element, as shown below:

Positioning Tooltips
To position tooltips in different directions, you can use the position property in CSS. The approach generally involves creating a container element for the tooltip text, setting its initial visibility to hidden, and adjusting its placement using top, right, bottom, or left properties.
Right Tooltip
.tooltip-right .tooltip-text {
  top: 50%;
  left: 125%;
}
Left Tooltip
.tooltip-left .tooltip-text {
  top: 50%;
  right: 125%;
}
Top Tooltip
.tooltip-top .tooltip-text {
  width: 120px;
  bottom: 125%;
  left: 50%;
  margin-left: -60px; /* Use half of the width (120/2 = 60), to center the tooltip */
}
Bottom Tooltip
.tooltip-bottom .tooltip-text {
  width: 120px;
  top: 90%;
  left: 50%;
  margin-left: -60px; /* Use half of the width (120/2 = 60), to center the tooltip */
}
Tooltip Arrows
Tooltip arrows help visually connect the tooltip to the element it's describing. They can be created using CSS with the ::after or ::before pseudo-elements, and by using border styles. Here's how to add arrows to tooltips:
Bottom Arrow
.tooltip .tooltip-text::after {
  content: "";
  position: absolute;
  border-width: 5px;
  border-style: solid;
}
/* Top tooltip */
.tooltip-top .tooltip-text {
  bottom: 125%;
  left: 50%;
  margin-left: -60px;
}
.tooltip-top .tooltip-text::after {
  top: 100%;
  left: 50%;
  margin-left: -5px;
  border-color: #555 transparent transparent transparent;
} 
Fade In Tooltips (Animation)
To fade in the tooltip text as it becomes visible, use the CSS transition property in combination with the opacity property. This will transition the tooltip from completely invisible to fully visible over a specified duration (1 second in this example).
.tooltip .tooltiptext {
  opacity: 0;
  transition: opacity 1s;
}
.tooltip:hover .tooltiptext {
  opacity: 1;
}
When you move the mouse over the text in the preview below, the tooltip text will fade in and take 1 second to go from completely invisible to visible.

